Vintage Schwinn Bicycle Reference Books & More
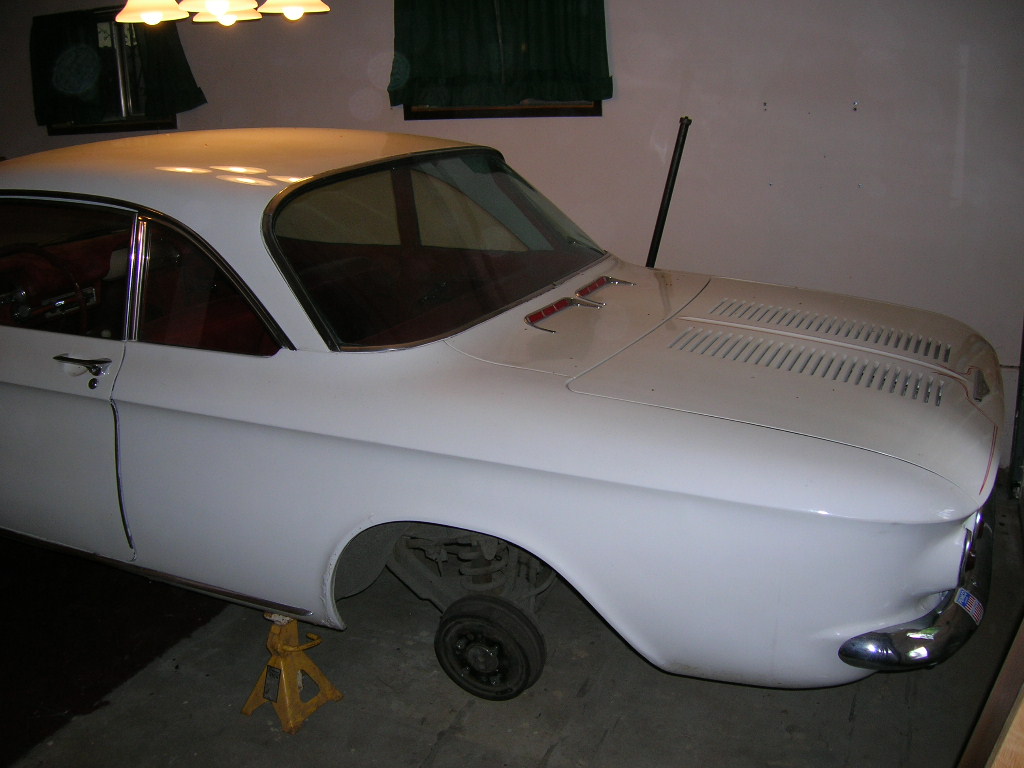
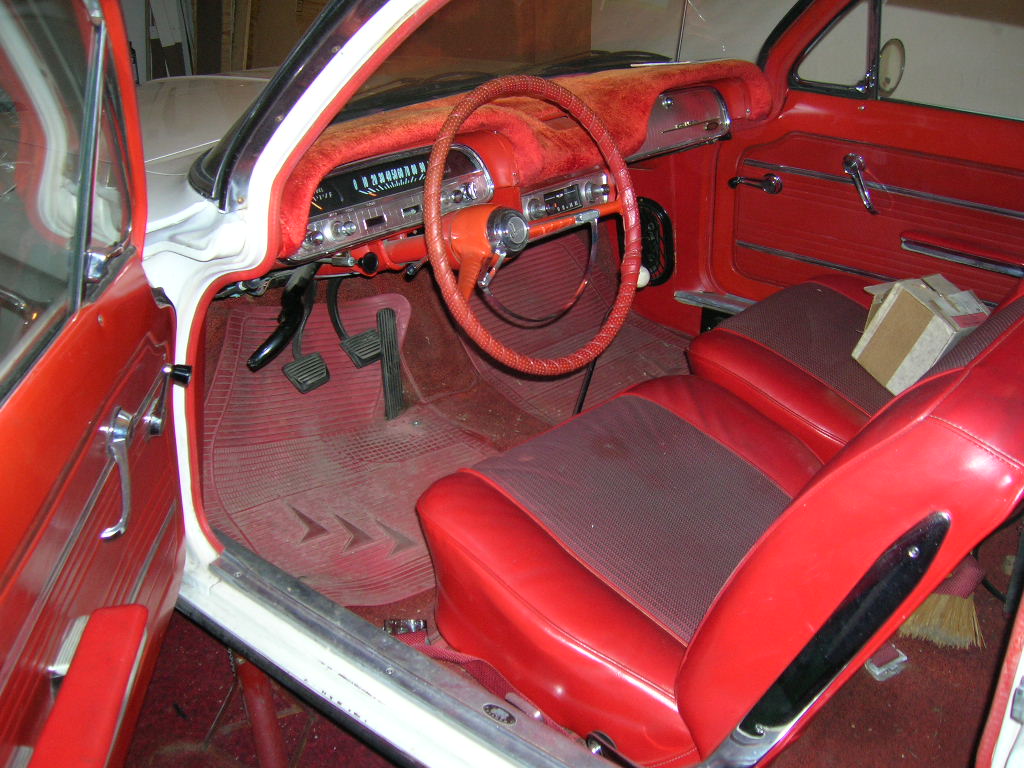
1961 Corvair Monza Coupe
(Pictures at the bottom of the page.)
Iinherited this Corvair from my grandmother in 2007. It hasn't moved under its own power since about 1984. In 1984 itwas parked in the garage and boxes of this-n-that were piled on it for the next 20+ years. Luckily for me I knew nothing about cars, so I was able to blissfully under-estimate the amount of time, money, knowledgeand effort it would take to make this car road-worthy again.
I'm putting a later (1964) engine in it, which I'm in the process of overhauling. (To say that in one sentence really glossesit over, but to lay it out properly would take several pages, and I know you don'thave that kind of time on your hands. In a nutshell: every piece of the engine was disassembled, revelant parts re-machined, new pieces purchased.) Putting in electronic ignition and switching from a generator to an alternator. I still need to replace the seat foam, which is harder than it sounds. Also need to drain the tank and purge the gas lines. Also need to purge the old brake fluid and install the new master cylinder, probably new brake shoes. Old shocks have to go. Weather stripping, window fuzzies, it goes on and on.
So far I've doneall of the workmyself (except for the machine shop stuff) which either makes me brave or stupid. Smart money says a little bit of both. But once it gets down to setting up the brakes and getting the engine set up for the initial start-up, I'm going to have to bring in some folks who really know what they're doing.
Dec 2010: Starting in on the Corvair again after a particularly long hiatus. It takes an amazing amount of mental power just to remember when the hell I was in the process and what comes next.
So here's where I left off:
-Engine partially assembled, which includes:
--Engine block halves and rear housing chemical dipped to clean skudge off.
--Oil channels filed to optimize flow
--Crankshaft bearing surfaces machined .010"
--Isky 260 cam with new cam gear
--95hp heads acquired, taken in for new valves, springs and seats
--Cylinder jugs bored out (was it 20 over? man, I forget)
--New pistons to match the cylinder bore, pressed onto original rods
--New bearings, sized appropriately
--New hardware for rods
--Checked clearances with plastiguage
--Assembled block with crankshaft and camshaft and assembly lube, indexed cam gear, torqued to spec in sequence
--Cleaned cylinder jugs to remove honing residue
--Assembled rings to pistons
--Assembled pistons to cylinders and then that sub-assembly onto the block with appropriate gaskets, hit it all with engine oil
--Assembled heads to engine, gradually torqued to spec in sequence
--Installed heat baffles on cylinders
--Cleanedpush rodtubes, checked push rods for straightness, assembled with O-rings, lubed with oil, installed
Man, I'm exhausted just thinking about it. Plus I sent the carbs out to Wolf Carb. Got fresh idler bearings. Bought a reconditioned alternator, plus scads of other new and used parts.
Right now I'm hung up on an exhaust stud that threaded back in far too easily, have an order into Clark's for a .030 and .060 oversized, if the 30 doesn't work then the 60 should do it.
And I'm tearing back into the rear housing, which I had previously assembled, but there was a rip in the gasket which I foolishly thought I would just gob gasket juice onto and call it good, but man oh man I don't want that gasket to give out and deal with an oil leak in the future, so I've popped the engine mount bracket off, pulled the harmonic balancer (Dale!) and now I've got to pop the rear housing off, scrape it clean, and do it right. Gasket and oversized exhaust stud are winging their way from Clark's.
If I manage to learn from all the mistakes I'm making on this project, I'll be a freakin' genius by the time it's done.
------------------------------------------------------------------
Rear housing is scraped clean. New gasket and oversized exhaust studs are in hand. Now can get moving forward again on the engine.
Cleaned the grime off of the engine sheet metal piecesand found that the rubber perimeter seals had deteriorated badly, which wasn't much of a surprise.
Pulled the rear axles out to replace the bearings.These are press-fit, so will have to take themto a machineshop to remove the old ones and install the new ones. Takes something like 5 to 10 tonsof pressure to install one of these bearings. On the early Corvairs, the axle bearing is all that holds the rear axle halves in place, and when one of these bearings implodes, bad bad things happen. Despite testimonials that having an axle walk out at highways speeds is one of life's more exciting experiences, I'm opting to go with new bearings.
In order to pull the axles, also had to remove the U-joint yokes. Right one was a nice tight fit, left one came of with no effort, which means that the left one was preparing to fail, so there's another part that goes on the order list.
Pulled the old vent fan motoroff as well, since it'll be pretty much inaccessable one the drivetrain goes back in. Going to replace it with a fresh one.
Mic'd the new clutch disc, and it's the correct thickness, hooray.
Taking the flywheel (a used Dale unit) and the pressure plate in to get the flywheel resurfaced and balanced and get the pressure plate balanced. It'll be a while before I get the engine off the stand so I can install these pieces, but at least they'll be ready when the time comes.
Now it's time to order up some perimeter seals and a bunch of other stuff. Whoo!
-----------------------------------------------------------------
Installed rear housing with a fresh gasket. Installed the rear skid plate and the motor mount plate, torqued to spec.
Installed the Dale harmonic balancer, greased the gasket surface and got a bit of green loc-tite on the crankshaft.
Got the oil cooler and the oil cooler adapter plate installed with new gasket and grommets. Took a bit to track down the correct screws, should have really taken the time to bag and label every screw / group of screws. Lesson learned.
Installed the oil pressure relief valve in the side of the back housing. Took a bit of page flipping to figure out what the heck it was. Which is I guess what happens when you take a year off in the middle of a project. Again, should have bagged and labeled it. Ah, but what a challenge.
One of the rear axles had a suspect looking aftermarket bearing on it, and the more I looked at the axle, the more it looked like the wrong axle. Sourced a pair of used '61 - '62 axles as well as a replacement spline yoke clamp.
After doing some research on the Forums, figured out I should have used a bit of gasket sealer on the exhaust donuts. Just as well, because I also figured out that I had a set of Clark's graphite donuts. Plus I forgot to put the front sheet metal bits on the engine, so the exhaust logs had to come off anyway. After replacing a wrecked nut (screw broken off inside, angle grinder, new nut and JB Weld to the rescue) on a front shroud piece and slapping some POR-15 on a particularly rusty section, got the front shrouds installed. Installed the exhaust logs with a bit of sealant and the graphite donuts, torqued to spec, tapped with a rubber mallet, torqued again.
Got an alternator style casting piece all cleaned up, old gasket scrapped clean. Bought an oil pressure switch socket, removed old oil pressure switch, installed new one.
Broughta top shroud home to clean it up and to get some POR-15 on a rusty corner.
Going to pop the rear axle bearings open to check the condition. I'm somewhat torn between repacking the old ones and just having new bearings pressed on. I already have replacement bearings, but if the old ones are still good....Andpulling and installing a bearing reduces the interference fit somewhat....Guess I'll see what the old bearings are like and go from there.
Dug up the paperwork from the shop that did the heads. Was curious if they installed seals on the exhaust valves or only just the intakes, because the vendor catalogs emphasize that the exhaust valves don't get seals. Looks like the shopinstalled seals all around, so will have to do the rope-in-the-cylinder trick to keep the valves in place and then pull the seals off the exhaust valves. At least I caught it early.
-------------------------------------------------------------
Got the alternator adapter piece cleaned up and installed. Tosseda rebuilt distributor in, just to keep stuff from falling in. Tossed the adjustable pulley piece on, and then figured out that a previousowner had either installed the wrong studs or had backed them out several turns. Once I track down the correct fine-threadnuts for these studs I'll try to eitherturn them inseveral more turns or spin them out and get replacements.
Tracked down the correct alternator bolts and did a test fit of the alternator. Then I triedto fitthe top shroud. Removed the alternator. Tossed on a magnesium fanand then tossed on the shroud. Tossed the alternator back on, and it just clears, hooray.
Picked up a chromed fan pulley because, hey, chrome, plus all of mine are rusted on the belt path, and hey, chrome. Of course I figure out about three days after I order it that there are two different mounting sizes, and of course I've ordered the one that is too small. So out comes the Sharpie to mark the material to be removed. And out comes the trusty half-round file. After about 30+ minutes got the inner diameter increased correctly and stillprecisely centered.
Got fresh perimeter seals from Clark's, plus the fiddly bits to install them, so that's one of the next things that has to happen.
Went to work on an axle bearing. I'm leaning back towards rebuilding the old bearings. These bearings have a two-piece dirt shield, dinged it up a bit getting it off, ah, the learning curve, a pickle fork probably wasn't the best tool. Drilled the rivets enough to pop them out. Popped the case open. Worked theaccessable bearing retaineroff bit by bit. On first inspection the bearing looks solid, no pits, no dulled surfaces, no metallic bits in the grease. Need to get some better crud-eater to clean out the inaccessable side. I'm sort of amazed that the weight of the caris supported bythese tiny barrel shaped bearings.
--------------------------------------------------------------------
I did it, I sealed up the engine. Fan pulley top plate assembly is now installed and torqued down. Prepped the two gaskets and the center vent plate and the top plate. Got all four layers aligned and started dropping in the bolts. I did something bad to my shoulder the day before, so was sort of gimping along, but got it all buttoned up. The next day I read a post on the Corvair forum about engines grenading, which brought back the paranoia for a little bit. Butlast year I distinctly remember finding a looserod nut, whichfreaked me out, and I re-checked the other eleven nuts, soit should be fine. And now it's sealed up, so no more second guessing myself, even though I likely deserve some second guessing.
After the fanpulley top plate,I installed the magnesium fan and the chrome pulley wheel. Snazzy! Tossed on the top shroud again without bolts, looks like everything clears.
The studs for the adjustable pulley wheel bracket just weren't installed all the way by the previous re-builder. Double nutted them, pulled them out, anti-siezed them, and turned them in all the way. Looks like the last guy tried getting them in with pliers. Sweet.
Installed a couple more bits of shrouding, the two flat-ish bits of rear shrouding above the damper doors. The bottom shrouds that I have out are both pretty banged up. I have another two sets of lower shrouds, but they're both on parts engines, so it's going to take some effort to get them loose.
Tossed the carbs on just as a mock-up. I'd also picked up a pair of aftermarket small chrome air cleaners from Clark's. (Mmm, chrome...) The logic being that replacing the stock unit would clean up the look of the engine compartment a bit. Also: chrome. Yeah, I'm a sucker. Mocked these up as well. Not actually sure how to do the final install on these, ah, things to figure out.
Perimeter seals. Pulled the old perimeter seals, which was just sort of fidgety and time consuming, all those little staples and such. Degreasing the shrouding pieces some more before the new seals go on. If I had the luxury of time and warm weather I'd just strip and paint these pieces, but that isn't going to happen. The rusty areas I just sanded down a bit and slapped some POR-15 on them. Installation of the new seals will start soon.
Degreased the heck out of the open rear axle wheel bearing. (Citrus-based Gunk degreaser, at lease it smells good whilethe fumeseat my brain.) Stood it upright in an old plastic bucket, foamed it up with degreaser every hour or so for the better part of a day. Rinsed with water and then foamed it up again. Then rinsed again and started cleaning the bearing out with Q-tips. Actually got it pretty darn clean. I'll check / set the clearances another day. Dripped some oil intothe bearingto keep things happy until I deal with the clearance and get this thing packed with grease again.
I've got two more decent axles that I'll be opening up the bearings on and regreasing. Hopefully will make for two functional driver axles and one back-up axle for the trunk.
<<<<<<<<<<<<<<<<<<<<<<>>>>>>>>>>>>>>>>>>>>>>
It's been February for while and I haven't had much time for updates. Got some stuff done, but man, everything takes forever.
Started in on removing the seals from the exhaust valves. Kind of a weird thing to do, and it's certainly not science, but it's a bit un-nerving because I haven't done this sort of stuff before and if I frack it upsomehow then I've got to pull the head off, and I really don't want to do that. So to pull the seals off the exhaust valves, first I have to hold the valve in place inside the cylinder. To do this one feeds some rope in through the sparkplug hole and then rotates the crank so the piston compresses the rope against the valve. Then one uses a valve spring compressor to, well, compress the valve spring so you can remove the keepers and remove the (still compressed) spring and then pull the seal off the exhaust valve. Not too complicated, but it still took a fair amount of fiddling about to just get the first two seals removed. Getting the keepers re-installed was the hardest part, small greasy parts with not much room to work and a highly compressed spring just sitting there. Waiting. Logically I know the spring isn't going anywhere, but if it did escape the compressor, well, I guess I'd have a bit more blood invested in this car. 4 more seals to go.
Got my first rear axle bearing dis-assembled, cleaned, toleranced (is that even a word? dang.), greased and back together. Cleaned the axle-bound bearing out with scads of degreaser and about 40 Q-tips. Had a brief moment of "what-the-hell?" trying to get the bearing barrels to stay in the cage to check bearing play. Then just wrapped the cage with a layer of electrical tape, pressed thebearings in place, lowered the cage onto the axle, and then removed the tape. Worked great. Once everything checked out, I used a dropper syringe to inject grease into the axle-bound bearing. Re-taped the loosebearings into the other cage, greased them up and dropped into place. Pulled the tape. Bolted the flanges together. One axledone, two more to go. (One to run, one as a spare.) Probably took a couple hours to do this start to finish, mostly in 5 - 15 minute sessions.
Hacking away at the perimeter seals. Opted to do the staple method. Of course the repop staples are wider than the stock ones, so each staple has to get bent a bit in order to line up with the original holes. The first one was the most difficult, trying to line up three awkward objects and getting a staple to feed back through the original holes. Dang. Who thought of this? I'm sure there's a trick to it, perhaps by the time I get to the fourth perimeter seal I will figure it out. Got the front shroud seal done up, then realized it could be tighter, then figured out how to make it tighter, and so I'm working my way backwards and re-doing the staples one by one. Still, much easier than the first time around.
Discoved than an extra transmission that I've had about has an intact reverse switch. Much less hammered looking than the one on the stock tranny. So with any luck this newly found switch will work and I can drop reverse lights in. A minor consideration, but still. And then I'll want to drop an additional brake light in the rear window, another relatively simple thing that will take too long to figure out.
Got the diff and tranny lined up. Decent looking starter set aside as well.
Still have to balance the pressure plate. And the first flywheel I took in for surfacing was a bit warped or bent or something. Themounting area looked a bit worked over (man, who knows where these parts have been over the decades), and the machine shop guy thought there was a bit of a warp. There's a 0.1mm difference in thickness in the flywheel, which sort of bugs me, not sure if it should or not. I have another flywheel, looks to be another Dale unit. Think I'll get this one surfaced and then search out someplace to do dynamic balancing on the pair.
Cleaned and assembled a pair of lower shrouds. Had extra shrouds to pick from, which was good, as most were bent or starting to tear around the mounting holes. Used the driver side one from the original engine, scraped about a quarter inch of muck off of the bottom surface. Found two decent thermostat units from the six or so available ones. The muck on these lower shrouds was epic, wish I'd had some sort of chemical bath to dunk them in. Once I get the exhaust valve seals removed then I'll think about installing the lower shrouds.
----------------------------------------------
Got the final four exhaust valve seals removed, only took about an hour. I supposed an experienced person could have done it much quicker, but I'm pleased that I managed to do it without losing a keeper ormashing a finger with a valve spring.
The process of removing just one seal requires many steps. Remove spark plug, rotate crank until piston is visible through spark plug hole, feed about 3 feet of rope into spark plug hole, rotate crank to compress rope against valves to hold in place, note number of threads showing above rocker arm nut, remove rocker arm nut and rocker arm, fidget with valve spring compressor, compress valve spring, tease the keepers off the end of the valve, remove compressed spring assembly, remove exhaust valve seal, replace compressed spring assembly, fumble the keepers back into place (wonder how something that looks so simple can be so difficult to actually do & wish for smaller fingers), release the valve spring, place rocker bits in place, tighten rocker nut to previous tightness, rotate crank back a bit to release rope, remove rope. Repeat. And in the end it all looks exactly the same.
Once I got the last of the exhaust valve seals off I got piston #1set at top dead center so that I'll be ready to install the dizzy. Ran through the steps twice because I don't quite trust myself with this stuff. Turned crank CCW until the #1 intake valve opened and closed, continued to turn crank CCW, piston #1 came into view, turned a bit more until the timing mark on the harmonic balancer was inside the timing range and the piston looked to be at the top of the stroke.
Next thing will be installing the distributor with a Pertronix unit. And figuring out the vacuum advance unit.
<<<<<<<<<<<<<<<<<<<<<<<<>>>>>>>>>>>>>>>>
Started in on installing and test-fitting engine sheet metal. Big rubber mallet helps to align the lower shrouds.
Got the valve covers re-installed.
Remembered to install the temp sensor in the right head. Hooray for me. Now just have to figure out the wiring for it.
Got the muffler heat shield cleaned up and assembled, will wait to install it until other bits are assembled.
Rebuilt a second rear axle bearing. Much easier the second time around.
Was going to install the plugs, then remembered that I hadn't gapped them. Plus my plug socket was in hiding. Felt like a winner.
Chrome air cleaners from Clark's are proving to be a pain. No instructions and the supplied materials don't appear to be the right thickness. Hooray for frustration.
Went though the various gas lines that has been knocking around. Looks like I bought a pair of new pump-to-carb lines. Handy stuff. And it looks like I havecouple of functional lines that feed into the pump, two different designs, so have to figure out if there's a functional difference that I should be concerned about.
----------------------------------------------------------------------------
Got a bit more work done on the engine. Fan belt is now installed, so that should put me in the home stretch. Still need to set up the dizzy and get a replacement wire to the head temp sensor, but it's starting to look do-able at this point.
While re-installing the blower fan, hunkered down in the engine compartment, it occurred to me that I really should replace the brake lines before re-installing the drivetrain. I know, I know, how'd I get to be such a genius, wow, couldn't have figured that out months (or years) ago. So now new brake lines are on the way. At this point I think it'll be all new brake parts from the MC down to the pads. It'll feel good to have fresh brake lines all around. Sprayed the connection points down with PB Blaster so hopefully things will dis-assemble with a minimum of cussing.
Pulled to old seal out of the diff snout. The lockring piece popped out easy, the only seal had to be knocked out from behind. Cleaned out the old bits and then used an appropriately sized socket toseat the new seal and lock ring into place. Took about twenty minutes of mucking about with and from the outside it doesn't look any different.
Used a screwdriver to pull the transmission shift shaft in and out.(Trans isout of car.)Found neutral.Got inside the car and shifted the shifter around. Figured out that the trans has all the indents, the shifter just moves around. Took some of the mystery out of the interaction between the shifter and the transmission. Seems to me that any reasonable adjustment of the length of the shifter shaft will only affect the position of the shifter relative to the driver.
In a couple weeks I should have the engine off the engine stand and be working on getting the differentail and transmission bolted together. Ever closer.
--------------------------------------------------------------------
Starting in on the brakes. Pulled the rear hubs. Stripped the front hubs. Dropped thetunnel pan covers to access the long brake line. Removed the rear brake lines, working on removing the front lines. New lines ordered and received from Clark's. Went through previously ordered brake parts (from like two years ago) and found that for some genius reason I hadn't bothered to order front brake cylinders. So got those ordered. Started in on converting over to self-adjusting brakes, and then figured out that the springs and hold down pins etc that I have (second-hand) are kinda junky. Ordered up fresh spring kits from Clark's. And since I had the tunnel pans off, figured I'd just toss a quick-shift kit on the order as well. Next step is to drop the gas tank to access the final brake line.
-----------------------------------------------------------------
Mid-May. Banner day under the 'Vair. Pulled the shifter to install the quick shift kit. Removed the shift shaft as well, need to install a rubber boot on the end, and the binder bolt is frozen. Couldn't find Loc-Tite at the garage, so brought the shifter home to lock the set screws in place on the shifter extension.
Pulled the gas tank as well. This took a bit more doing. Pulled the fat rubber grommet at the fill pipe topside. Propped the tank with a jack and then removed the strap that holds the tank in place. Didn't have a decent way to drain the gas, and it's a borrowed garage so didn't want to stink it up with gas fumes. So I pinched off the rubber gas line connector piece with vice grips, pulled it off the long fuel line, and the folded it over on itself, removed the vice grips, and then held the fold in place with zip ties. Hated to do it, but had to snip the wire to the fuel guage sender; should be easy enough to solder back together later.
Got the tank partially dropped, then figured out that I need to jack up the front of the car a few more inches. Floor jack to the rescue, and then I adjusted height on the jackstands. Finished pulling the tank. The rubber connector hoses between the fill pipe and the tank were both dry and falling apart. Another good thing to replace. Drained the gas from the tank. Soon will pull the fuel guage sender to replace the o-ring (and drain the last dregs of gas) and then we'll see what the inside of the tank looks like.
-----------------------------------------------------------------------
Late May. Rebuilt both rear brake assemblies. New shoes, new springs, new cylinders, used self-adjusters. Would have been easier to do these on the car, but it's difficult to get over to the garage. Getting the order of assembly correct was a challenge, and the second brake assembly went much quicker than the first.
Cleaning the old grease out of the front hubs and axle bearings. Pretty easy but takes a little while. Got as much grease injected into the bearing assemblies as I could. Used the bearings that were with the car, so we'll see how they hold up.
At the garage, pulling the last of the brake lines and starting in on installing others before I forget how they go. Struggled with the front one that connects the front brakes. Finally figured out that I was trying to force it through the wrong hole in the driver side wheel well wall. Felt like a genius. I frequently feel like a genius when working on this car. To get the long brake line free had to removethe center pan under the dash.
Put the shifter back in the car with the quick shift kit installed. Wasn't really thrilled with the quick shift kit out of the box, ended up shimming inside the extender so it wouldn't flop around, now it's much better. Got some lube in the shifter mechanism, now much smoother. Previously had pulled the long shift tube so I could cut a siezed bolt off the adjuster. Got the shift tube back under the car and hooked up to the shifter. Going to have to finally give in and buy the rubber boot piece that fits on the end of the shift tube, the old one is nothing but solid dust.
Next session hoping to get the brakepedal / master cylinder backin the car and get theunder-car brake lines installed. Maybe even get the front brake drum assemblies assembled.
<<<<<<<<<<<<<<<<<<>>>>>>>>>>>>>>>>>>>
June / July. Got the engine finished up. Flywheel, clutch andpressure plate installed. Pertronix installed. Crossbar and carb linkages installed.Lotsmore fiddly stuff. Oil pan on. Oil and ZDDP poured in. Took the engine down to Rex in Salem for initial start up / troubleshooting / tuning. Just heard back from Rex after about a week, engine started up and ran just fine, which was a relief. He made a few small tweaks, but for the moment it looks like I actually did an okay job of putting the engine back together. I know, I know, thousands of stoned high schoolers successfully rebuild their auto engines every year. So as accomplishments go it's rather middling I suppose. But at least my rebuilt engine didn't blow up and catch Rex's garage on fire. Perhaps it's saving that treat for me.
Finished plumbing the brake lines. Made a few minor routing adjustments on the previously installed rear lines. Had to step away for a while before I could really see what was happening again. But got them routed and clipped just like factory.
Now to bench bleed the MC and see if I can bleed the entire brake system.
Got the e-brake cable lubed up and re-installed.
Got the front brakes assembled with minimal cussing.
Pulled the carpetfrom the front seat area of the interior. No rust-through in the pan, but a few areas of established rust. Took some POR-15 to it. Should have taken care of the battery box while I was at it.
Pretty much prepped to get the engine back in once I pick it up from Rex in Salem. Not to jinx it, but it should be pretty straight-forward work to get the diff and transmission mated up to the engine and then hoisted / jacked into place. And hooking up the clutch and shifter and gas line bits doesn't look that daunting. For some reason I'm sort of dreading the electrical bits.
<<<<<<<<<<<<<<<<<<<<<<>>>>>>>>>>>>>>>>>>
Got the engine back from Rex in Salem. He said it started right up. He made a few little tweaks and did the initial start up with no problems.
Hauled the engine back to Portland and mated it up to the differential and transmission. Was a bit of a chore getting everything lined up, but with the aid of the engine hoist was able to do it without another pair of hands. Remembered the gasket between the diff and tranny. Got the clutch rod and throw-out bearing installed.
Drained the diff and tranny of the old fluid. Used asucker tube to get the last bits out of the diff. Replaced the cork gasket seals. Poured in some new fluid, found the right fluid that won't attack the brass bits in the tranny.
Got the small parts lined up so when the powertrain goes back in I'm not searching around for castlenuts and cotter pins, etc. Rear motor mount parts are assembled, ready to go. Trying to make sure that all the stuff I need to do before the motor goes back in gets done.
Going to use the floor jack and the engine hoist to get the enginein place. Powertrain is currentlyon a furniture moving roller. The plan is this: Putthe powertrain in position under the car. Jack under the tranny, hoist attached to the rear mount, or perhaps to a tie-down strap around the engine. Hoist and jack so front mounts can be attached. Move jack from tranny to under engine. Put a couple boards on the jack, hold engine in place. Remove hoist. Attach rear motor mount.
Think I have to hook the heater hoses first. And make sure the rear brake line fittings are truly tight in the junction block. I guess we'll see what I forgot to do once the engine is back in place.
----------------------------------------------------------------------
July / August.
Got the drivetrain back into the car. Jacked the tranny end up and onto the mounts far enough to get the nuts threaded on about six turns. Then hoisted the rear of the engine into place, moved the floor jack under the engine skid plate and held it in place with the jack. Installed the motor mount and got it torqued into place. Tightened up the tranny mounts. Got the pins threaded through the castle nuts.
Hooking up the engine controls should have been easy, but I found several ways to make it take longer than it should have. Found out the hard way that when you remove the brake master cylinder that the clutch pedal plate is only held on by one bolt. So every time I went to press the clutch pedal the mount would move a bit. Then I'd crawl back under the car and take slack out of the clutch cable, then rinse and repeat. Figured it out on the third time, because, yeah, I'm a genius like that.
Shifter should have been easy to hook up. Except that at an earlier time I'd managed to mess up the install on the quick shifter. Dropped the shift tube and got the business end of the shifter popped into the receptical on the shift tube. Forward gears feel fine. Reverse is a bear toget into. Just moving the shifter to the left is difficult. But it does go into reverse. I have a spare transmission if it comes to that. Also replaced the nylon shim piece that the shift tube moves through. Took out a touch of play. To really do it right I'll have to throw down for a new coupler in the rear.
E-brake was reasonably easy to hook up. Previously had run some oil through the housing to free up the movement. Even found the return spring. Whoo.
Accelerator should have been easy, but managed to lose a new grommet. Ordered another one, and then a few more shim bits to maker sure I wouldn't be opening it up again. Once I had the right parts, went together easy.
Had the rare foresight to install the front engine sheet metal so the accerator rod and other various tubes and wires could feed through correctly.
Went to toss the exhaust Y-pipe on. Should have taken about ten minutes. But the exhaust logs on the engine weren't aligned quite right (1/4 inch off or so), so had to drop the lower shrouds, loosen up the exhaust logs, smack them with a rubber mallet, and curse a bit. Got the Y-pipe on, only took about an hour and a half.
Then went to toss the muffler on. Just had to find the muffler strap. Could have sworn I had ordered one, but now it seems quite likely that I actually had not. Was hoping that the FLAPS would have one, but I guess this isn't a standard GM part. Sent off another order to Clark's after poring over the catalog to make sure I hadn't missed anything. A few days later I got the part andgot the muffler installed.
When I took the axle yokes off the axles, I had the entire engine compartment to myself, with plenty of room for an impact wrench. Getting them installed with the drivetrain in place has been more of a challenge. Was all going pretty smoothly until I went to install the second u-joint into the freshly installed axle yoke. The u-joint was slightly to wide to seat into the yoke, with some force it would seat, but it caused noticable drag on the bearings. I should have trial fitted these pieces before installation, I really should have. The classy thing would have been to have removed the yoke and dremelled the retaining tabs just a bit. The quicker thing was to take an angle grinder to the u-joint end caps just a bit. I heart my angle grinder.
Wasn't psyched about the used nature of the trannymount bolts that I'd used. So replaced the lower two ones with some longer grade 8 ones. I'm pretty sure the used ones would have been just fine, but hey, paranoia cha cha cha. Going to replace a few more high stress boltsafter another run to the hardware store.
Put the tunnel pans back on. Used new hardware. Holes mostly lined up okay. Not a comfortable position to work in at all.
Pulled the speedo cable. Coiled it in a bucket with some motor oil for about a week. Slid it back into the housing. Blindly sprayed some Tri-Flow at the back of the speedometer case, hopefully got some in the bushings. Attached the cable to the speedo and the diff.
Doing static adjusting on the brakes is giving me fits. Even with the adjusters dialed all the way in and the brake pads centered there's some minor drag. Forum says one thing about drag, manual says another. Going to go with minimum drag adjustment for now. Got the front drums installed. Tightened up the axle nuts per themanual and installed cotter pins. Front wheels now installed. Whoo.
Cleaning out the gas tank so I can seal with POR-15 tank sealer. Using the Marine Clean stuff to get the varnish and gum out. Stuff goes in clear, comes out looking like cola. Awesome. More cleaning to go.
--------------------------------------------------------------------
October. Much work has been done since the last post.
- Cleaned out the gas tank and sealed with the POR-15 tank sealer. Followed the instructions to a "T". Duct taped an old hair dryer up to the tank inlet to keep the air moving and assist in the drying process.
- Installed the tank in the car. Hooked up the hoses and the filler neck before the tank went in. With a bit of finangling and a minimum of cursing the tank went back into place. Hooked up the retaining strap. Hooked up the rubber gas lines to the long metal gas lines.
- Re-adjusted the brakes yet again and finally got pedal. Whoo! Bled them again and found that one of the automatic bleeding valves was defective. Factory didn't drill the hole all the way through, so brake fluid wasn't bleeding properly. Pulled it apart and drilled the hole and it made things much better.
- Hooked up the accelerator rod return spring. And installed the accelerator rod boot in the engine compartment.
- Removed the old rear shocks and installed fresh Gas-A-Just shocks.
- Started in on installing perimeter sheet metal in the engine compartment. Should have done this earlier. Oh well. Front piece went in with the engine. Got the left side piece installed. Right side piece will be next.
- Pulled the quick-shift kit out. Replaced all the wear parts on the shifter, still couldn't make it work worth a darn. Adjusted the coupler rotationally on the rod, couldn't find the sweet spot. Feels much better without the quick-shifter. Lesson learned.
- Installed a new voltage regulator. Had to drill some new holes.
- Wired up the alternator. Purchased the "wires, connectors and instructions" kit from Clarks, very glad I did. Would have never figured it out on my own. Got out the soldering iron and went through every step very carefully. Got to the end and went to plug the wide flat plug into the voltage regulator, and it wouldn't fit. The metal opening on the voltage reg just wasn't large enough. Pulled the reg and very carefully used the angle grinder to remedy the situation.
- Bought a new battery. Original battery hold downs are pretty rotted, good enough for one or two drives, but got to get them replaced.
- Still up on blocks with a bit more to do, but fired up the engine. Ran rough at first and then leveled out. Revs nice. Sounds like a lifter still needs to pump up. But no sparks, no fire, no smoke, no awful sounds. Once I tweak a few more things I'll get it on the road to see if the brakes pull. Called up and got insurance on it, which was one of the last steps. Dang close to getting it road worthy.
-------------------------------------------------------------------------
October 9th, 2011. Drove the Corvair home. Need to adjust the clutch cable and do a few other things, but it's about 98% of the way done.
---------------------------------------------------------------------
Got the clutch cable adjusted. Amazing how just three turns in the difference between clashing gears and smooth operation.
Did some high speed reverse-then-brake sessions on the side street to get the brakes to self adjust. The self adjusters actually worked and the brakes now feel much better, parking brake included.
Got cocky and decided to drive on a short grocery errand, generator light be damned. Sure enough, conked out in traffic about half way home. Pushed it onto a side street, really felt like a chump. Luckily Mat from bike club was driving the opposite direction on the main street and had seen me pushing my car (winner!) and had turned around to see if I needed help. So I got myself and the groceries home on time. Went back later with a can of gas (maybe I just ran it out??) but it wouldn't fire and battery was giving up. So like four days after getting my Corvair on the road, I got to have it towed home. Again, winner.
Long story short on the generator light: Went to the Corvair Forum for help, they pretty much narrowed it down to the alternator. I'd purchased the alt as a rebuilt unit from a Corvair vendor, but figured, hey, I should at least get it tested by a place that knows what they're doing and eliminate it as the culprit. Took it down to PMX, sure enough, bad alternator. Turns out two diodes were installed backwards. Two days and $55 later, rebuilt alternator take 2. Installed the alt, worked great, gen light goes off once the car starts, voltage at battery when running at idle just under 14v. Whoo!
Also went around and replaced blinker and tail light bulbs with new units. Driver side rear directional socket had been bumped a couple times in the last 50 years, no longer perfectly flat or round, same for the body shell. Ended up replacing the socket portion of that unit with a generic replacement from the auto parts store. Just took an angle grinder to the old socket and lopped it off. New one goes in and flange fingers get bent over to hold it in place. Soldered the wires.
The passenger side blinkers would light but not blink. With the help of the Corvair Forum I finally got it though my head that the socket piece and the reflector piece of the rear light assembly sometimes corrode enough to no longer make good contact. Soldered a length of wire onto the socket portion of the assembly and ran it into the engine compartment to an existing body ground. Passenger blinkers work! But on the last re-assembly the lens screws (which are already oversized and had felt none too snug) stripped the last of the available metal from their holes. I think some speed nuts and JB weld will take care of this problem on a later date.
Still have to get down to the DMV.